

In summary:
- Holding a plank for more than two minutes offers diminishing returns; form and tension are more important than duration.
- Proper breathing mechanics (breathing “behind the shield”) dramatically increase core activation and spinal stability.
- Side planks are essential for correcting muscular imbalances and asymmetries that front planks cannot address.
- The most common plank error, hip sag, negates all benefits and can actively harm your spine by forcing it into hyperextension.
- Progress is achieved by increasing lever length (long lever plank), not by adding seconds to the clock.
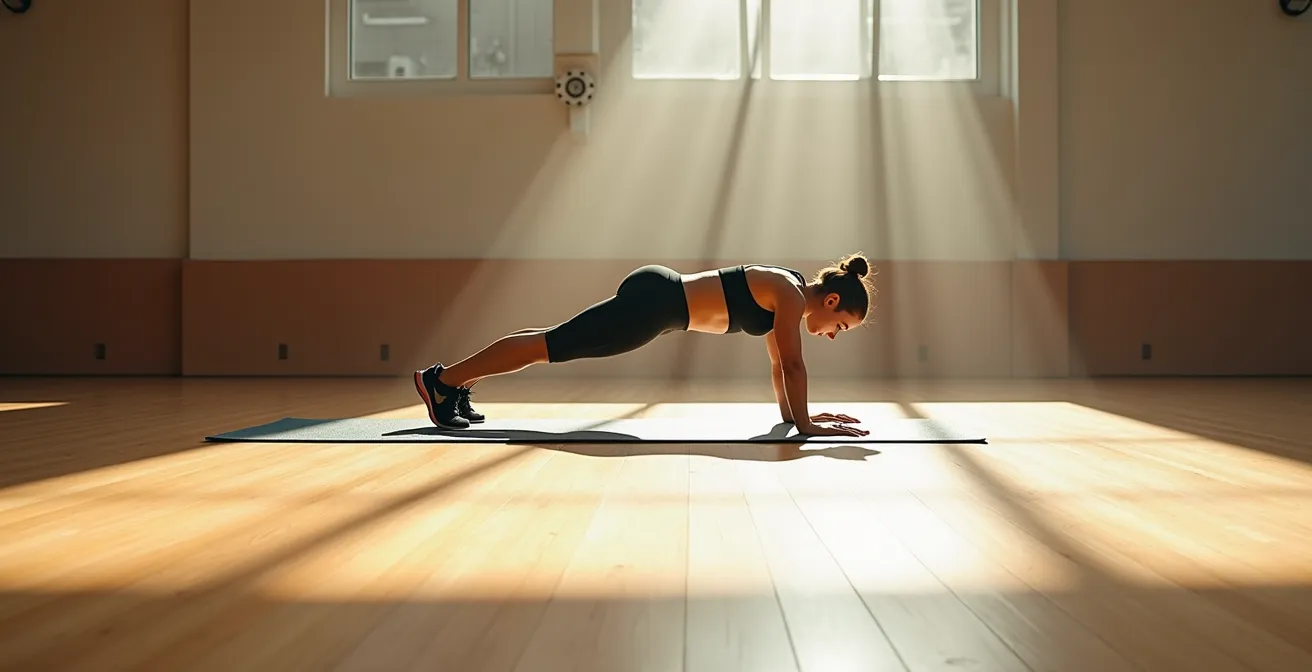
If you’re an office worker, you’ve likely been told that planking is the panacea for your desk-induced back pain and slumping posture. You’ve probably even tried a 30-day plank challenge, grimacing through five-minute holds, only to find your lower back still aches and your shoulders still round forward. Here’s the uncomfortable truth: you’ve been sold a lie. The common wisdom around planking—that longer is better—is not just wrong, it’s counterproductive.
Most planking tutorials focus on endurance, turning the exercise into a vanity metric. But a plank is not an endurance event; it’s a corrective tool. Its purpose isn’t to test your mental grit but to teach your body a single, crucial skill: anti-extension. This is the ability of your core to resist arching, the very motion your lower back is forced into after hours of sitting with an anterior pelvic tilt. Holding a sloppy plank for five minutes only reinforces bad posture. In contrast, a perfect, high-tension plank held for a shorter duration can actively reprogram your neuromuscular system.
This guide isn’t about holding a plank for longer. It’s about holding it better. We will deconstruct the exercise, moving away from the obsession with time and focusing on the mechanics of true core stability. You will learn why your five-minute plank is a waste of time, how to use your breath to create a “corset” of stability, and how to progress the exercise in a way that actually protects your spine for the long haul. Forget the clock; it’s time to focus on correction.
This article breaks down the precise methodology for transforming the plank from a frustrating chore into a powerful postural reset. Follow these principles to build a core that supports you, not just in the gym, but through every hour you spend at your desk.
Summary: How to Hold a 2-Minute Plank That Actually Fixes Your Posture?
- Why a 5-Minute Plank Is a Waste of Time for Most People?
- How to Breathe Behind the Shield to Intensify the Plank?
- Side Plank vs. Front Plank: Which Fixes Asymmetry Better?
- The Hip Sag Error That Turns Planks into Spine Destroyers
- When to Move Your Elbows Forward: The ‘Long Lever’ Progression
- Why Static Planks Don’t Help You Stay on a Moving Board?
- The ‘Over-Rotation’ Mistake That Herniates Discs
- How to Build a Core That Protects Your Spine During Heavy Lifts?
Why a 5-Minute Plank Is a Waste of Time for Most People?
The fitness world’s obsession with duration has turned the plank into an exercise in futility. The goal should never be to simply accumulate time under tension; it must be to accumulate *quality* time under *correct* tension. Once your form breaks down, you are no longer training your core for stability. Instead, you are teaching your body to compensate by hanging on its passive structures—your ligaments and spinal joints—which is the exact pattern we are trying to undo.
The moment your hips sag, your pelvis tilts forward, or your shoulders drop, the anti-extension benefit is lost. You are now loading your lumbar spine in a vulnerable, extended position. For an office worker already battling the effects of anterior pelvic tilt, this is not just ineffective; it’s actively harmful. The idea is not to see how long you can endure, but to determine the maximum duration you can hold perfect form.
This isn’t just theory; it’s backed by research. While many chase arbitrary five-minute goals, evidence suggests the point of diminishing returns arrives much sooner. In fact, two minutes is considered the maximum beneficial duration for a static plank hold by experts. Beyond this point, for most individuals, fatigue leads to form degradation, negating the postural benefits and increasing injury risk. The focus must shift from a marathon to a sprint of perfect execution.
How to Breathe Behind the Shield to Intensify the Plank?
The single most powerful, and most overlooked, component of a corrective plank is your breath. Most people either hold their breath, creating unsustainable tension, or they breathe shallowly into their chest, which fails to stabilize the lumbar spine. The correct technique is to “breathe behind the shield.” This involves creating a rigid, 360-degree wall of tension around your midsection and then breathing diaphragmatically *behind* that wall.
Imagine your core is a canister. To stabilize it, you must pressurize it. First, create the “shield”: gently brace your abdominals as if you’re about to be lightly punched in the stomach. This engages the transverse abdominis (TVA), your body’s natural corset. Now, the key: breathe into your belly and sides, pushing outwards against this shield. Your chest should not rise significantly. This creates Intra-Abdominal Pressure (IAP), which acts as a hydraulic lift for your spine, protecting it from compressive and shear forces.

This method of bracing and breathing is fundamentally what separates a functional core exercise from a superficial one. While a sit-up primarily targets the rectus abdominis (the “six-pack” muscle), a correctly executed plank engages the entire core musculature system. In fact, American Council on Exercise research shows that planks generate more deep core muscle activity than traditional sit-ups, precisely because they demand this kind of integrated stability.
Side Plank vs. Front Plank: Which Fixes Asymmetry Better?
While the front plank is the star of the show, focusing on it exclusively is a critical mistake, especially for office workers. A desk-bound lifestyle doesn’t just promote poor posture in the sagittal plane (forward and back); it creates significant imbalances in the frontal plane (side-to-side). We lean on one armrest, cross our legs the same way, and carry bags on the same shoulder. This leads to one side of our core—specifically the obliques and gluteus medius—becoming weaker or tighter than the other.
The front plank is an exercise in sagittal stability (anti-extension). It does very little to challenge or correct these lateral asymmetries. This is where the side plank excels. It is an exercise in frontal plane stability (anti-lateral flexion), directly targeting the muscles responsible for keeping your pelvis level and your spine from bending sideways. It is the perfect diagnostic and corrective tool. If you can hold a side plank for 60 seconds on your right side but only 30 seconds on your left, you’ve just identified a significant imbalance that is likely contributing to your back pain.
Case Study: The Power of Plank Variations for Athletes
A study on recreational athletes highlighted the specific benefits of different plank types. While both conventional front planks and dynamic variations improved core endurance, the findings specifically noted that side planks are uniquely effective at strengthening the gluteus medius and external oblique muscles. These muscles are critical for providing lateral stability to the hips and spine, preventing the “hip drop” that is often a source of lower back and knee issues.
To truly fix your posture, you must address all planes of motion. The following table breaks down the fundamental differences between these two essential exercises.
| Aspect | Front Plank | Side Plank |
|---|---|---|
| Primary Muscles | Rectus abdominis, transverse abdominis | Obliques, gluteus medius, quadratus lumborum |
| Plane of Motion | Sagittal (anti-extension) | Frontal (anti-lateral flexion) |
| Asymmetry Detection | Limited | Excellent (compare hold times) |
| Spinal Stability | Anterior-posterior | Lateral |
The Hip Sag Error That Turns Planks into Spine Destroyers
The single most destructive error in performing a plank is the hip sag. This is the moment when fatigue sets in, the glutes and abdominals disengage, and the pelvis drops towards the floor, forcing the lumbar spine into hyperextension. This doesn’t just make the exercise useless; it actively reinforces the very postural dysfunction—anterior pelvic tilt—that we are trying to correct. It’s like trying to put out a fire with gasoline.
To prevent this, you must adopt a corrective mindset. The goal is to maintain a slight posterior pelvic tilt (PPT) throughout the entire hold. Think of tucking your tailbone slightly or bringing your belt buckle towards your chin. This action engages the lower abdominals and glutes, flattens the lumbar curve, and puts your spine in a safe, neutral position. The moment you can no longer hold this PPT, the set is over. There is no negotiation. This is your body’s signal that the targeted muscles have reached their limit of useful work.
While a single perfect hold shouldn’t exceed two minutes, building the capacity for that hold requires consistency. General research indicates that consistent practice of 3-5 minutes total daily (broken into multiple perfect-form sets) over 4-6 weeks significantly improves core stability. The key is that this time is accumulated through perfect, shorter sets, not one long, sloppy one. Your primary focus must be on preventing the hip sag at all costs.
Your Action Plan: Hip Sag Prevention Checklist
- Initiate the hold with a slight posterior pelvic tilt (tuck your tailbone). This is non-negotiable.
- Maintain tension in the glutes and abdominals; they should feel active, not passive.
- Keep the hips perfectly level and square to the floor, especially when transitioning or tired.
- Drive the balls of your feet into the floor to create a counter-force that helps stabilize the hips.
- If your form breaks or hips sag, immediately end the set or regress to a knee plank to maintain the correct motor pattern.
When to Move Your Elbows Forward: The ‘Long Lever’ Progression
Once you can comfortably hold a perfect, high-tension plank with a posterior pelvic tilt for 60-90 seconds, how do you progress? The common but incorrect answer is to simply add more time. The correct, biomechanical answer is to increase the challenge by manipulating leverage. The most effective way to do this is with the ‘long lever’ plank.
A standard plank has your elbows positioned directly beneath your shoulders. This creates a relatively short lever arm for your core to stabilize. To perform a long lever plank, you simply walk your elbows forward, increasing the distance between your elbows and your feet. Even moving your elbows a few inches forward dramatically increases the torque your core must resist to prevent extension. This exponentially ramps up the demand on your abdominals, particularly the rectus abdominis and obliques, without adding a single second to the clock.
This progression is superior to adding time because it forces a higher quality of contraction. You cannot cheat a long lever plank. Any weakness in your anti-extension capacity will be immediately exposed as your lower back tries to arch. It’s a self-correcting exercise: if you can’t hold the position with a neutral spine, the lever is too long. This method of progression forces you to earn every inch of advancement, ensuring that you are building real, functional strength rather than just “endurance” at the cost of form. Start with a small shift forward and gradually increase the lever as your strength improves.
Why Static Planks Don’t Help You Stay on a Moving Board?
Mastering a static, corrective plank is the foundation. It teaches your body to find and hold a neutral spine. However, life isn’t static. Whether you’re catching a stumble on an icy sidewalk, playing a sport, or even just shifting in your office chair, your core needs to provide reactive stability. A static plank, performed on a stable floor, does not train this quality. It builds a strong house, but it doesn’t prepare the house for an earthquake.
To bridge the gap between static postural correction and dynamic, real-world function, you must introduce instability and movement. This forces your nervous system to learn how to anticipate and react to changing forces, which is the true definition of a functional core. Once you have mastered the foundational static holds (front and side), you can begin to incorporate variations that challenge your anti-rotation and anti-flexion capabilities in a dynamic context.
Regular core training can significantly reduce back pain, especially for chronic issues where activating deep stabilizing muscles is key.
– American Council on Exercise, The Science Behind Planking Study
Integrating these movements is what translates your newfound stability into tangible benefits like reduced back pain and improved athletic performance. Start with a few repetitions of each, focusing on minimizing any extraneous movement in the hips and torso. The goal is to maintain the same rigid “plank” position while your limbs are in motion.
- Plank with Alternating Shoulder Taps: Teaches anti-rotation. The goal is to tap the opposite shoulder without letting the hips rock.
- Stir-the-Pot Planks: Performed with forearms on a Swiss ball, this challenges stability in a circular pattern.
- Spider-Man Planks: Involves bringing a knee to the outside of the same-side elbow, challenging the obliques and hip mobility.
- Plank on a BOSU Ball: Placing feet or hands on an unstable surface forces constant micro-adjustments.
The ‘Over-Rotation’ Mistake That Herniates Discs
As you progress to dynamic plank variations or other rotational core exercises like “wood chops,” a new danger emerges: over-rotation of the lumbar spine. Many people, in an attempt to generate more power or achieve a greater range of motion, mistakenly try to twist from their lower back. This is a biomechanical catastrophe waiting to happen.
Your spine is not designed for uniform rotation. It’s segmented, with each region having a different primary function and range of motion. Your lumbar spine (lower back) is built for stability; it’s designed to resist motion, not create it. Its primary job is to support the load of the upper body. Conversely, your thoracic spine (mid-to-upper back) is built for mobility. It is designed to flex, extend, and, crucially, rotate.
The numbers are stark and non-negotiable. Biomechanical research shows that the lumbar spine allows only about 13 degrees of rotation in total. Trying to force more is like trying to bend a steel pipe—something will eventually give, and that something is often a spinal disc. In contrast, the thoracic spine is capable of a much healthier 70 degrees of rotation. Therefore, all safe and powerful rotational movement must originate from the hips and the thoracic spine, while the lumbar spine remains stable and braced—in its “plank” position. Mistaking the source of rotation is one of the fastest ways to injury.
Key takeaways
- The goal of a plank is perfect form for up to two minutes, not five minutes of sloppy endurance.
- Correct breathing and a posterior pelvic tilt are non-negotiable for engaging the core and protecting the spine.
- True postural correction requires addressing all planes of motion, making side planks as important as front planks.
How to Build a Core That Protects Your Spine During Heavy Lifts?
The ultimate test of a functional core is its ability to protect your spine under load. The principles you master in a corrective plank are directly transferable to every heavy lift you perform, from deadlifts and squats to picking up a heavy box. The bracing sequence is identical: you create IAP by breathing “behind the shield” and lock your pelvis and ribcage together into a single, rigid unit. The plank is simply the practice ground for this skill in its purest form.
A strong, stable core acts as a force transmission system. When you lift something heavy, the force generated by your legs and hips must travel up through your torso to the bar or object. If your core is “soft” or unstable, that force dissipates, and your lumbar spine is forced to take up the slack, leading to shear forces and potential injury. A properly braced core ensures that 100% of the force you generate is applied to moving the weight, making you stronger and safer. Clinical research demonstrates that the plank exercise strengthens core muscles and brings significant changes in proper alignment and posture.
To transfer your plank strength to your lifts, start thinking of every lift as a “plank in motion.” Before you pull a deadlift, ask yourself: “Am I holding the same full-body tension I would in a perfect plank?” Before you unrack a heavy squat: “Is my core braced and my spine neutral?” Using the plank as a pre-lift activation drill can be incredibly effective. Performing a 30-second, high-tension hold right before your main lift can prime the neuromuscular pathways needed for safe and powerful execution.
By shifting your focus from duration to corrective intent, you transform the plank from a mindless exercise into a precise daily tool. The objective is no longer to survive a five-minute hold, but to execute a perfect two-minute hold that actively reverses the postural damage of a modern lifestyle. Begin today to implement these principles and build a core that not only looks strong but provides a lifetime of spinal protection.